
In this tutorial we will describe our IP blacklist monitoring service. You might get on its page and found out that it requires you to log in before you can set up your monitors. Maybe you are asking yourself, is this service worth registration? What should I expect? How does it look like inside? Is it complicated to use it? Hopefully, we will address all these questions in this tutorial.
Note that this tutorial is intended for basic users and those who are not registered users yet. We do not get into all the details here and some features are being skipped. If we skip something that is interesting for you, do not worry. On every page within the blacklist monitor interface, there are helper texts on the bottom that explains every control on that page. And as always, if you need any help, just contact our support and we will take care of you.
So, let’s begin.
Your Monitors
Your monitors is the very first page you will see as a logged in user. Here is how it looks (click the image for the full resolution version):
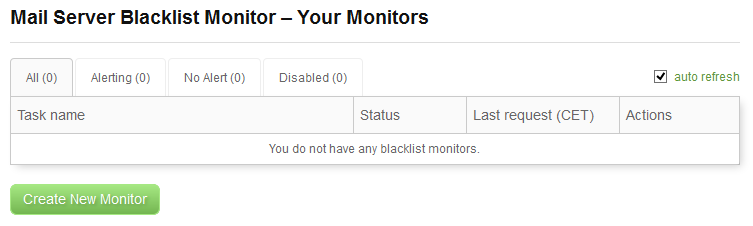
In this table you will see your blacklist monitors once you create them. At the beginning you have no monitors, so nothing interesting is to be seen here. The only useful control here is the Create New Monitor button, so let’s click it and create our very first monitor.
Create New Monitor
The form for creating monitor might seem complex, but you can use it very simply if you want to. Here is how its Parameters tab looks like:
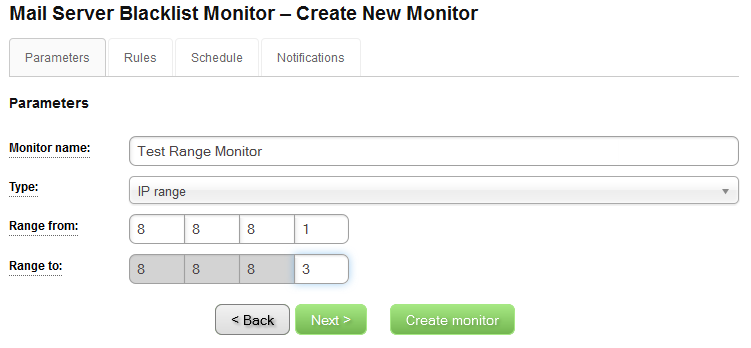
In this picture, you can see that we have named our monitor Test Range Monitor and we have set that it is an IP range monitor. The other option for the monitor type is Single IP. What is the difference between these two types? Simply, the IP range monitors contains a range of IP addresses. In our example, we will monitor the range of 3 IP addresses 8.8.8.1 – 8.8.8.3. The Single IP type of monitor is there if you need to monitor only one IP with your monitor. The maximum range you can set here is 256 IP addresses, also known as /24 network, formerly known as C Class network.
And you know what? That’s it if you like! You do not need to fill in anything else than the values on this tab of the form. Right now, you can click the Create monitor button and your monitor will be created and it will work just fine. If this is your case, feel free to skip the rest of this section and continue with Your Monitors – Monitor Created below.
For those of you who want to tweak your monitor settings little more, let’s click the Next button, which takes us to the next tab – Rules. It looks like this:
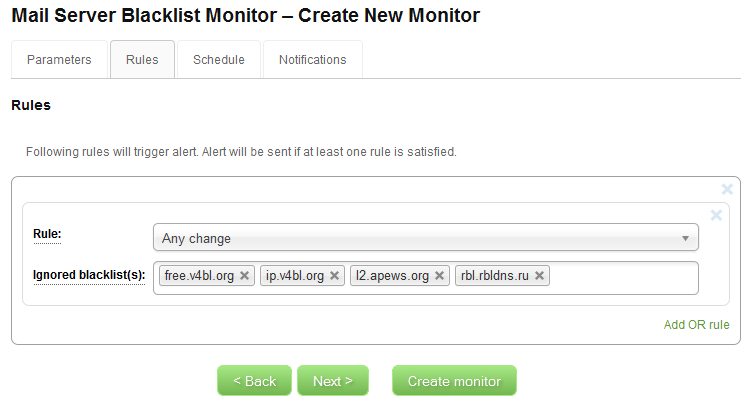
On this tab you define monitor’s rules that will trigger an alert. You can see that one rule is defined already for you. This rule can be translated as ”Alert me if any change is detected except if the change was detected on blacklists free.v4bl.org, ip.v4bl.org, l2.apews.org, rbl.rbldns.ru.” In other words, this rule will cause that an alert is sent to you if any monitored IP address becomes listed on any blacklist except of those we ignore, or delisted from any blacklist except of those we ignore. Another type of rule you can define is Target host new listed, which is the same as Any change, except that it will send an alert only if an address becomes listed. Delisting will not trigger an alert in this case. These two options are the most common rules you should use. There is also a third option, but that is only for advanced users who are interested in receiving alerts only from a couple of blacklists.
You might wonder why it is useful to define a list of ignored blacklists? This is quite important because not all blacklists provide reliable data all the time. We have identified a couple of blacklists that are not very reliable and may cause false alerts. Ignoring them is especially useful if you are monitoring a large pool of IP addresses and you really want to be informed about real incidents. If you leave the rules on the Rules tab in their default state, you should be fine. You can also add rules and have multiple rules for your monitor, but again, this is not very useful for basic users.
So, let’s click Next and examine the Schedule tab:
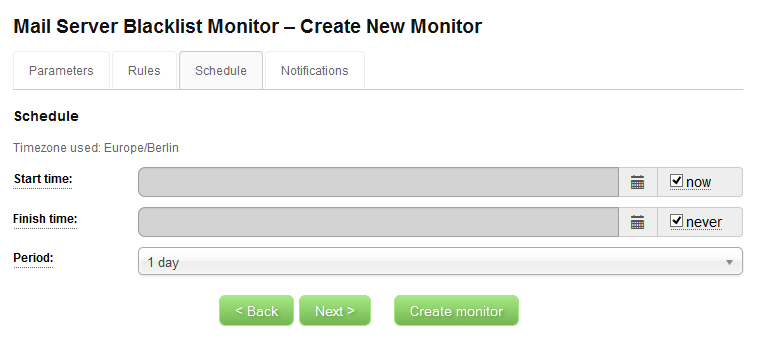
The only important setting on this tab is the Period. By default, your monitor is set to monitor once per day. Each execution costs credits, so be careful when you change this. The highest monitoring frequency available is 8 hours. You can also limit the live of your monitor by changing Start time and Finish time values. By default, your monitor will start as soon as possible after you create it and will not end monitoring until you disable it, delete it, or until your account runs out of credits.
Click Next and move on to the Notifications tab:
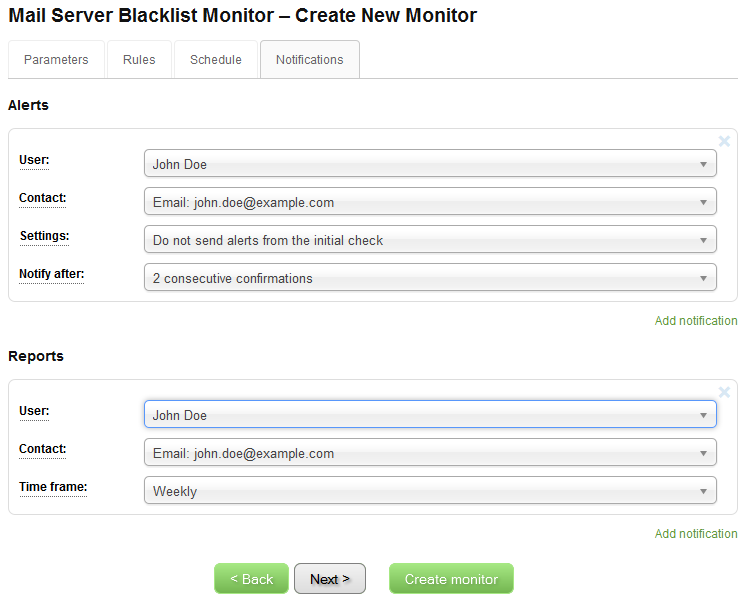
This one is quite important, but as you can see, some values are predefined again, and as usual, if you change nothing here, you will be just fine. For some users, especially bigger companies with more users under their Online Domain Tools account, this settings might be important to change. So, what do we see here?
There are two sections – Alerts and Reports. Let’s start with alerts. Alerts are notifications that are triggered by rules as we defined them on the rules tab. What we see on our screenshot is that an alert will be sent to our user John Doe via email to his address john.doe@example.com. Note that alerts can also be sent via other methods. For example, some companies might find HTTP(S) callback notifications useful and process the alerts via their script automatically. These two fields are probably easy to understand, but how about those other two – Settings and Notify after?
The Settings value is either Do not send alerts from the initial check or Send all alerts, the former being the default value. And what that really means is that at some point every monitor has to perform the blacklist check for each of its monitored IP addresses for the first time. The Do not send alerts from the initial check value says that you are not interested to receive alerts from this very first check. Once again, this is very useful for companies that monitor many IP addresses, such as hosting companies or ISPs. It is common that almost every IP address in your range is listed on a couple of blacklists, because some blacklists simply list every IP address that does not contain a reverse DNS record. And when you manage an IP range in /24 network, it might be the case that some IP addresses are unused or are used by servers that do not need reverse DNS record defined. In this case, using Do not send alerts from the initial check will prevent to flood your mail box with two hundred of emails with alerts from the initial check. On the other hand, if you are monitoring only a single IP of your most important mail server, feel free to set this to the Send all alerts value and you will receive an alert if that IP is listed on any blacklist that is not ignored by the rules.
Notify after is the second line of defense against unreliable blacklists. Sometimes even good blacklists have their moments and report wrong results. The Notify after settings defines how many same results in a row have to be obtained from each blacklist in order to consider that value as confirmed. Until the listing status of a monitored IP is confirmed, an alert will not be sent. Let’s demonstrate this on an example. Let’s assume we have a blacklist monitor that runs daily and monitors our IP address. Let’s assume there is a blacklist X that produces the following results over a seven day period:
- 1st day: IP is listed.
- 2nd day: IP is listed.
- 3rd day: IP is NOT listed.
- 4th day: IP is listed.
- 5th day: IP is listed.
- 6th day: IP is listed.
- 7th day: IP is listed.
This scenario is real and can happen from time to time on a couple of blacklists. What happened there? Most likely we have received a wrong results on the 3rd day. If we look at the results after a couple of days, it seems evident that the IP was and is listed all the time. It was just that a system or a network problem or some other thing caused that on the 3rd day we have received a wrong result. We do not want to receive alerts because of such rare problems. And we will not receive these false alerts if our Notify after value is set to 2 or more consecutive confirmations. Because the monitor saw the OK (NOT listed) status only once, it did not become confirmed and thus did not trigger an alert. We highly recommend you to use 2 or 3 consecutive confirmations here. 2 should be just fine and will not probably reduce the false alert rate to almost zero. More than 3 would delay the alert for too long, so unless your monitor’s period is set to a higher than daily frequency, do not set this to more than 3.
Now the Report section. Reports are summaries of monitor’s operation sent to an email. You do not have to receive Reports if you do not like to. By default a Weekly reporting is being set to the account’s primary contact. We do recommend Weekly over Monthly frequency here because Monthly reports might be just too long to read, especially with IP range monitors. Some users may find Daily reports useful, so they are also available.
Monitor is Running
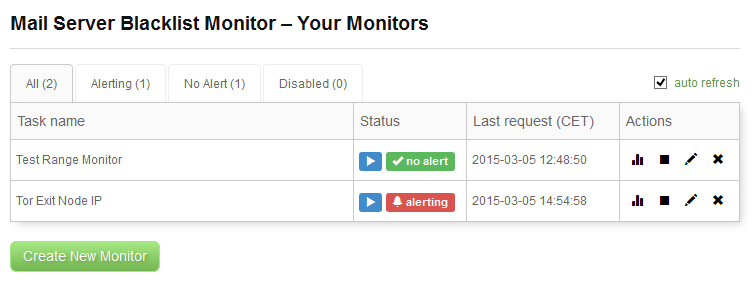
After we hit that Create monitor button we are back on the main page with the list of our monitors.
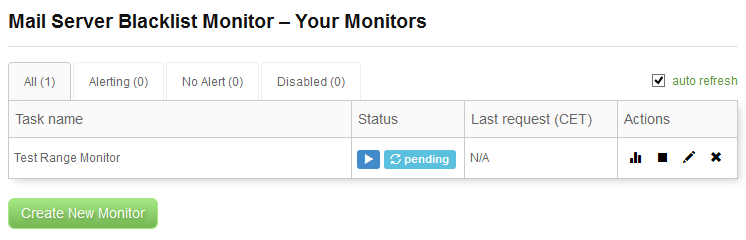
What we see here is our monitor and it is in the Pending state. This means that the monitor has not executed any check for any of its IP addresses yet. If we wait just a couple of minutes, this situation here will change:
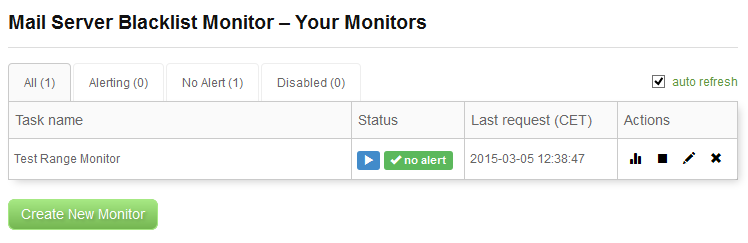
We see that the status of our monitor changed to no alert. This means that the last check the monitor made did not trigger any rule, no alert was sent. OK, so let’s examine the monitor now. As you can see there are some icons in the Actions column on the right of the table. The icon on the left will navigate you to the monitor’s report page. The other icons are for disabling the monitor, editing the monitor, and deleting the monitor. We now click the first icon to see the report page.
Monitor’s Report Page
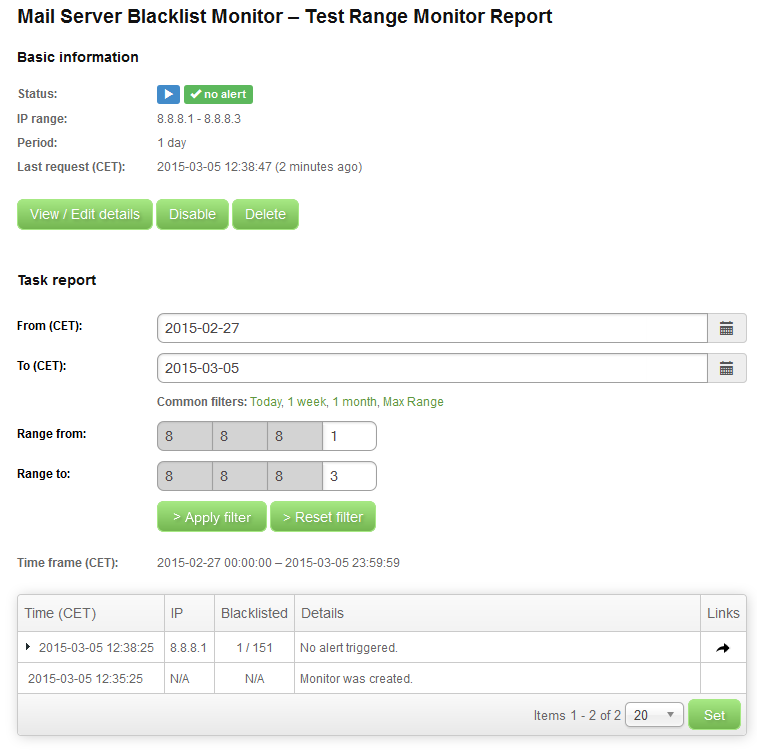
As you can see, there is a brief summary of the monitor on the top of the page and a couple of buttons that allows you to control your monitor in a same way that the icons do on the main page that we have just described. Below that we can see a simple filtering form that most of the time you will not need to use because the default view, just below the form, should contain all the data you will need for your work. So, let’s focus on the report data in that report table. At this moment, we see only two events. The first one is the information on when the monitor was created. The second one is more interesting. It is the first blacklist check for the first address. We see that the monitored IP address 8.8.8.1 was checked against 151 blacklists and was found listed on 1 blacklist. When an IP is listed on at least one list, there is a black arrow on the left of the time stamp. Click it to see the details:
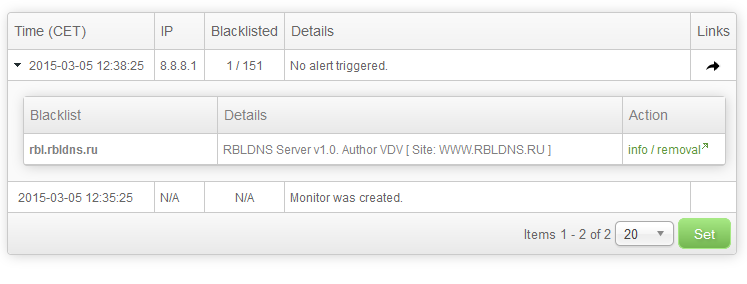
The row expanded and information about blacklists that listed the monitored address was displayed. We also see the details provided by the blacklist itself. We recognize that the IP is listed on rbl.rbldns.ru blacklist, which is on the ignore list in our monitor’s rule. This is why this result could not trigger an alert. We would not receive an alert anyway, because we set that 2 consecutive confirmations are needed in order to confirm the state, so this state is not even confirmed yet. But we would not receive an alert even if that blacklist was not ignored and even if we required only 1 consecutive confirmation. Why? Because we set the Do not send alerts from the initial check setting and this would be the initial check.
Let’s now wait a couple of minutes and refresh the report page:
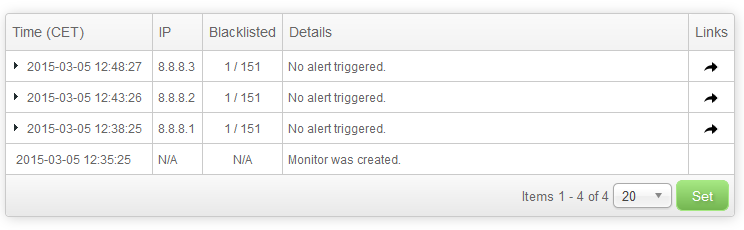
What happened here is that checks for the other two IP addresses that we are monitoring were checked. This is how IP range monitors work. The IP addresses are processed in a serial fashion and there is a small delay between the checks.
Alerting Monitor
We now want to see how the blacklist monitoring behaves when a monitor is alerting. In order to see that we have created a single IP monitor on one of the TOR exit nodes (a server that provides specific services to anonymous network called TOR). TOR exit nodes are listed, usually on more than one blacklists. Our monitor is called Tor Exit Node IP:
This is the main table after the initial check of our second monitor. We have set our monitor to require just 1 confirmation and to send all alerts, so even the initial check triggered an alert. Let’s examine the monitor’s report page.
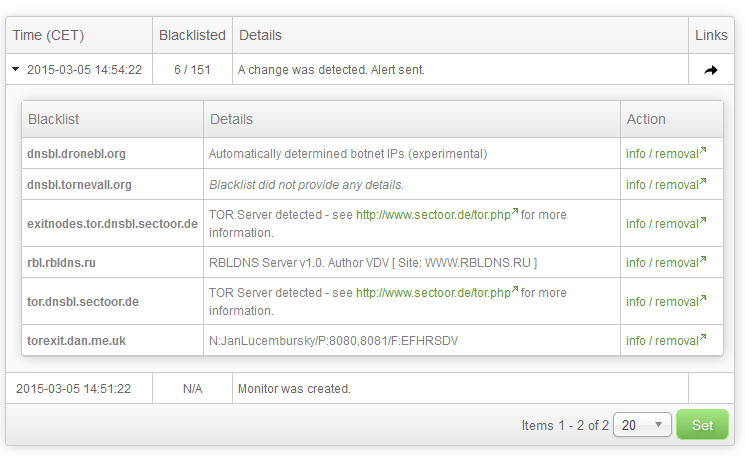
Here we can see the event table with expanded row of the initial check. 151 blacklists were checked and 6 of them is listing the monitored IP. For each listing we see info / removal link that will get us to the page where we can either request delisting of our IP address or read more about the blacklist and its policies. This is the fastest way to obtain more information and get delisted.
Finally, we have received an email alert. In our email client, it looks like this:
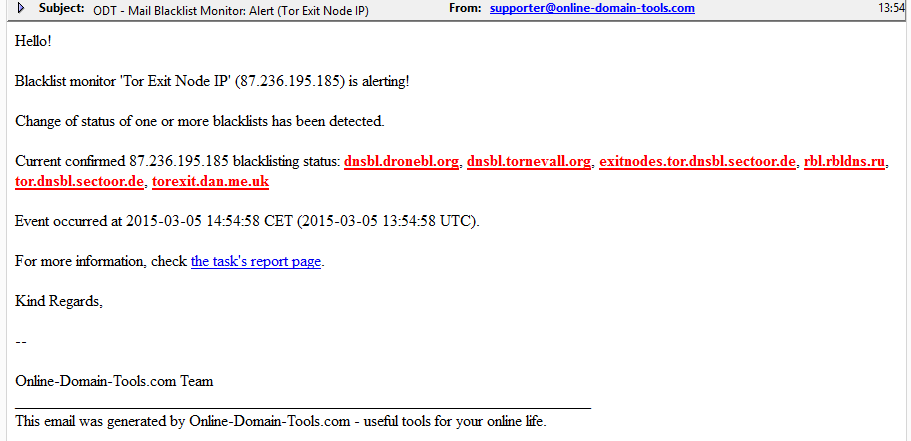
We are informed which IP address of which monitor triggered an alert and we can clearly see the latest status of the IP address. Again, each listing is clickable and navigates us to the information or removal page of the particular blacklist. The blacklists written in red signal new listings, blacklists in bold signal confirmed listings (so the bold red that we see on our screenshot is obviously for confirmed new listings). Striked out blacklists would be those that were listed previously, but are not anymore. Blacklists not written in bold suggest unconfirmed listings.
That’s it! Thank you for reading this tutorial. We hope you will like our blacklist monitoring service and that it will help you doing your business.